
The next time your preschooler wants to have a tea party, why not serve it on your own custom tea tray? This tea tray is easy to make and perfect for serving snacks and drinks. You can customize your tray with images from your preschooler’s favorite storybook, or design it to match their bedroom or playroom.
What You’ll Need
Unfinished Wooden Serving Tray
Spray Paint
Decoupage Medium
Photocopied Images From a Favorite Book
Scraps of Colored Paper
Floral Die-Cuts
Tea Bag (optional)
Step One: Choose a Theme
Photocopy images from your preschooler’s favorite storybook onto plain white paper. Images can be black and white or color. If you choose to make black and white copies, you can add an optional tea-stain (see directions below). For more detail, add floral die-cuts, available in the scrapbooking section of most stores. Because my tray is black and white, I added small strips of red scrapbooking paper for extra color.
Photocopy images from your preschooler’s favorite storybook onto plain white paper. Images can be black and white or color. If you choose to make black and white copies, you can add an optional tea-stain (see directions below). For more detail, add floral die-cuts, available in the scrapbooking section of most stores. Because my tray is black and white, I added small strips of red scrapbooking paper for extra color.
Step Two: Paint the Tray
Lightly sand your tray, and wipe clean before painting. Select a spray paint that coordinated with your photocopied images. In a well-ventilated area, spray the entire tray with two coats of spray paint. Be sure to let the first coat dry completely before beginning the second one. Hold the can approximately 10 – 12 inches from the surface of the tray, and use broad, sweeping strokes. This will help reduce drips and create an even, glossy final coat. 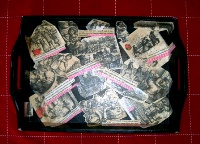
Step Three: Design Your Layout
Place the photocopied images, floral die cuts and scraps of paper on the tray, until you find an arrangement that pleases you. Remove the images before you begin to decoupage.
Step Four: Decoupage the Tray
Be sure to read the manufacturers instructions before applying the decoupage medium. With a small sponge brush, apply the decoupage to the backs of each image, and carefully lay it on the bottom of the tray. Press out any air bubbles with your fingertips. Let the image sit for a couple of minutes before wiping up any extra decoupage. Repeat with the die-cut flowers and paper strips. Using a flat brush or a sponge brush, apply the decoupage to the entire inside of the tray. Let dry and then sand with 400 grit sandpaper. Apply a second coat and let dry overnight. Polish the surface with #0000 steel wool.
 Step Six: Time for Tea!
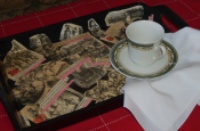
This whimsical tray is a great way to make the snack time special. Serve tea and cakes or hot cocoa after a long day sledding. When my son was feeling under the weather, I served him to lunch in bed with this tray. He perked up immediately! This tray also makes a great crafts caddy, for transporting paints, brushes, and crayons.
Optional Step: Tea Staining Images
Steep two bags of plain black tea in three cups of very warm water for five minute. Pour the water into a shallow baking pan. Soak photocopied images in the water for two to three minutes. If the stain is not dark enough, try blotting images with the wet tea bag. Let dry for at least an hour, before applying decoupage.
More Decorating Ideas
-Instead of using images from your preschooler’s favorite book, try photocopies of family photos. This makes a great gift for grandparents!
-For a more coordinated look, line the tray with leftover wallpaper from your preschooler’s bedroom.